Wednesday, March 30, 2016

Memory Bear…

"STATE-LINE CRAFTER'S"

Memory Bear…


 10568800_10204600992171937_4542729694324197029_n

Hello everyone it’s Cheryl. I am a BIG fan of teddy bears, I have them in different places in my home. One day my sister Pam showed me how she made a teddy bear out of her husbands PJ’s. So cool! So I went home and made one out of a T-shirt and it’s been in my living room now for 3 years. Love my Memory Bear! I wore that T-shirt everywhere, so it had a lot of memories build inside of it…

 
Well what I am sharing with you today is if you want like your own memory bear, send me a Top or T-shirt or even PJ’s and I will make you your very own MEMORY BEAR!


 Email me: statelinecrafters@gmail.com for more information on getting your own memory bear sent to you!

Panda Bear Throw...

Panda Bear


“STATE-LINE CRAFTER’S”

 12496078_757282918660_2651876199780496681_o


Panda BearThrow

 Hello everyone it’s Pamlea, I am the oldest of the Moore girls. I have been sewing and doing many projects for years. I was so happy to hear my sister Cheryl came up with this idea on putting are projects online to share with everyone. I joy is that I make these projects for other people to enjoy, I just love making them. Brought up in a home where all your mother did was sew, kind of passed on to all four girls. Today I 
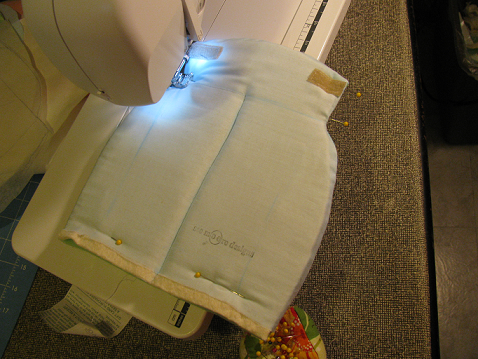
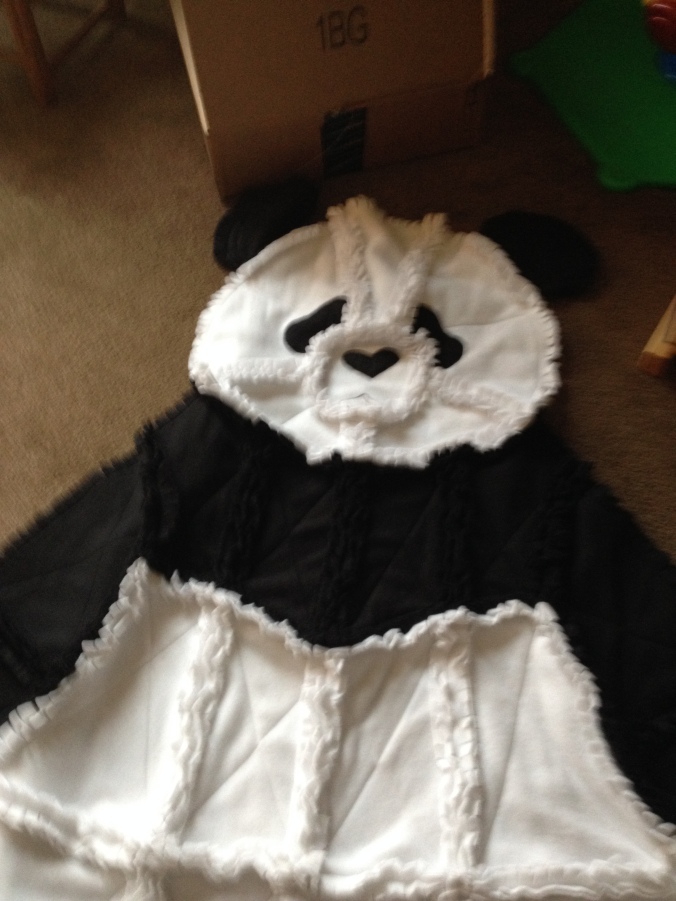
am sharing a Panda Bear Blanket I made for my grandson.
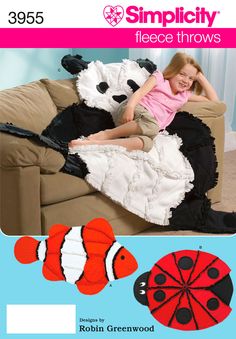
 Fleece Panda Bear Rag Quilt/Blanket Throw by PatchworkLuxury:


Panda Rag Throw!

This delightful panda bear fleece throw is approximately 52” by 60” in size. It is made with black and snow white fleece. It is a great gift to be used while relaxing on the couch, in bed, or even a wall hanging! It is super soft and comfy! You can wash it in cold water and dry it on low heat! Everyone will love this charming panda bear throw!

 bear patterm

 The grand-kids love this quilt. They love dragging it around and cuddling with it. Its FUN! It is perfect for a twin size bed and it dresses up a double bed. You will love it! Great throw while watching TV, or reading a book. Would make a great lap blanket for anyone. This blanket would be terrific for the beach too! Great conversation piece. Remember, washing it helps with the ragging effect.

 1312016 251(1)

 My quilts are made with fleece. Light weight only about 2.8 lbs but snugly warm.
 

 1312016 225


 For baby on up to any age. It’s a blanket that anyone would want to cuddle. If the Panda is not for you, Consider a puppy, bear, butterfly, fish, lady bug, polar bear, caterpillar, turtle, dinosaur, owl, or flower.

 1312016 225

This would make a very unique gift.
Machine wash, tumble dry low. This quilt has been pre-washed to start the ragging process. the more you wash the more comfy it will get. Makes a great keepsake.


'STATE-LINE CRAFTER'S'

 Spring is in the Air...

Spring is nature’s way of saying, “Let’s party!”
Robin Williams


10553491_10204035864970031_5661830124427492192_n


 Hello everyone it’s Connie, the baby and the cutest one in the family.  So happy to share with you a dress I just finished for my grand child Eden. She will LOVE that Grammy Bear sent her a gift.


Spring is in the Air…


It’s my youngest granddaughter’s second birthday  coming up and I wanted to make something special.
How about a twirl-y dress for tea parties with Grammy Bear……


 I bought this pattern to make this dress for Eden, but with all my travels, I never got to it. It’s called the Addison.


Here’s the back of the dress. I can’t wait to see it on her.

Happy Birthday Eden!


Grammy Bear LOVES you so much…


Talking about spring in the air…


this little bird has been hanging on our deck here the past two days.  He looks totally roughed up, but he let me get with in 5 feet of him, he keeps coming back.


Cheers to Spring!

YOU CAN VISIT ME ALSO: http://hotflashncraftn.blogspot.com/


Monday, March 21, 2016

Easter Cards The Stampin Up Way…

“STATE-LINE CRAFTER’S”

“Easter Cards”

“Easter is the time to rejoice and be thankful for the
gift of life, love and joy.”
Have a Blessed Day!

     28302_1390389532871_6170126_n                
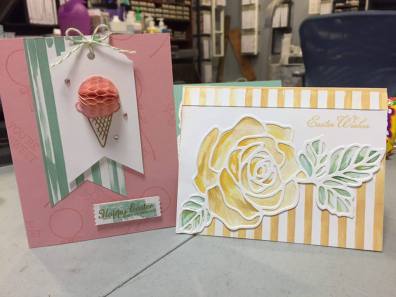
Hello everyone it’s Leslie, spring is here and you know what that means…. Making cards for the grand children and getting their baskets ready for Easter Morning. In my home as a child, one year my mother dressed my father up as a Easter Bunny! Mom would hide the baskets around the house and when us four girls would get up. It would be time to hunt for the golden baskets. Then later mom would hide the eggs outside and again all four girls would take are baskets and run around the house and find all the egg hiding in the yard filled with candy. Those were the days! Well it past on to my children and now the grand children.


Well it that time of year to decide weather or not to buy or make Easter cards for my 6 grandkids. So with me being a Stampin Up Demonstrator I decide to make them. With all the tools at hand I was just trying to come up with an idea.


12517151_1183280158362247_229176628_o

Steps I took to making Easter Cards
1)   I started out by finding a stamp set to work with.
2)   Color, Stampin Up has over 40 colors to pick from and from paper to ink they all match.

 12476532_1183219948368268_1955225569_n

3)   Why not pick one that comes with a framelits so I do have to take longer cutting it out by hand.
4)   Knowing who the card is going to is a big thing in my book, I wouldn’t want to spend a lot of time on a card that will hit the basket before the glue drys!
 12380346_1183219971701599_105320876_n12443274_1183219978368265_1629648510_n12571294_1183219985034931_756190948_n12721662_1183219991701597_470941424_n

5)   Watercolor is quick and easy ,a water brush and ink how easy is that and you use whisper white paper to paint on.
6)   Cut out framelits for outline and have fun painting.

 12498747_1183242038366059_346136807_n

7)   I found a Easter lamb , stamped him out used and colored him in then used a framelits to cut him out , used a few embellishments.
8)  I put them together with glue dots, snail Adhesive, and Stampin Dimensionals. I know sometimes it seams like their is so much but I’ve been in Stampin Up for over 11 years . It a great way to spend time with family and friends, or just to get out of the house.


 12721604_1183219958368267_678460318_n

Happy Easter!

Grand kids love them!

Stampin’ Up can be found at: http://www.stampinup.com/ECWeb/
or
Just ask Leslie she would be HAPPY to help you…

Sometimes You Just Need a Break!

“STATE-LINE CRAFTER’S”

Preserves Filled Cream Cheese Pound Cake

“People who love to eat are always The Best People”
Julia Child


   10553491_10204035864970031_5661830124427492192_n                            
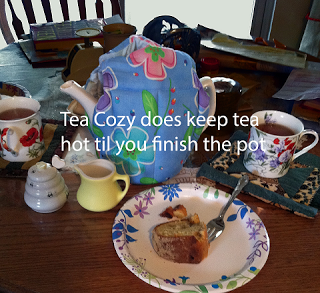
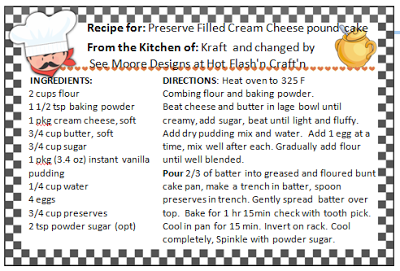
Hello everyone it’s Connie, remember the baby of the family and the cutest…Today it was time to take a BREAK and cook something I enjoy eating. Cream Cheese Pound Cake, WOW! Can I cook or what. Uncle Chris always says “Boy those MOORE girls knows when it’s time to EAT!” Yes I do and LOVE a great dish too! I hope you enjoy this dish!
 

Preserves Filled Cream Cheese Pound Cake

My favorite food is CAKE.  My Mom and I both like cake with our afternoon tea.  Since I’ve been here with her, I’ve made 6 different cakes, 5 bunts from scratch.  2 Coffee, 1 chocolate, and this one rather I changed it to a Strawberry Rhubarb-filled cream cheese pound Cake.


It’s a recipe out of the Kraft Food and Family magazine, it’s also on-line at
I followed the recipe except it calls for 1 cup sugar, I used 3/4 cup, and used Strawberry Rhubarb preserves.

DELICIOUS!


Especially with Lady Grey tea.  I like milk and honey in my tea.  Mother drinks it
straight.
Look we had visitors…… 
 
Mother and I came to the same conclusion that this yummy pound cake, it could easy stand
alone.  The preserves make it sweeter, but with fresh berries and whip cream…… that would also be very good.

 
I made a recipe card for my version of this wonderful cake.  You can find free recipe cards all over the web. Here’s where I got this one….Free recipe cards
Thanks for stopping by.
 

Happy Cooking!


Monday, March 14, 2016

How to Shorten Curtains

     “STATE-LINE CRAFTER’S”

Doing what you like is Freedom…
Liking what you do is Happiness…
     28302_1390389532871_6170126_nHello everyone it’s Leslie, today I would like to share with you one of the projects I just got done doing up at the Cabin!

“How to Shorten Curtains”

How to shorten curtains. First , you need to measure the outside of the trim on the window frame. Second , you need to decide how long you would like the curtain to hang under the window. In my case we had a heat duct under both windows so I measured them 10 inches above the heat duct. This made the curtains 70 inches long.


12674137_1177525955604334_1650666941_n 

When I bought the curtains I wanted a set that you couldn’t see thru, so I got a set with a lining, sheer. This also means there are two hems. I used the length of the hem that the curtains had for a guide.

Third, ripping out the stitching on both side to be able to separate the pieces juts high enough to shorten them. Cutting off the outside off the curtain, measuring from the top of the curtain down to the bottom, measure 73 1/2 inches. This has the length of the curtain plus a 3 inch hem and a 1/2 inch to turn under for sewing. Ironing and pining is a must. Mark at the 70 inches and make a chalk line for ironing , iron a 1/2 inch at the bottom , then fold up and press up on the 70inch line the pin. Sew 1/8 inch on the 3 inch piece. Fourth, inside piece cut it off 1 1/2 inch from the bottom of the curtains.


When pressing this hem you need to turn over and press at 1 inch , then your going to turn it over again this is to put weight on your hem. Press afterwards. Pin sides back together , sew down the sides , good to go. Hang them back up, and it didn’t cost you anything.
Good job!
I LOVE spending time at the Cabin!  


Wednesday, March 9, 2016

Tea Cozy for Hot Tea

"STATE-LINE CRAFTER'S"

Tea Cozy for Hot Tea


I attended a Tea party with my Aunt Junie, last year.  The hostess of our table had a tea pot I'd never seen before, it was an Insulated Metal covered Teapot with cork stopper, love it!!   Of course I had to have one! With the insulator it keeps your tea hotter longer, that's awesome.   I priced them online,

brand new they were $100....


A month later I found 

this one at a garage sale, 

$5.  Yes it has cracks in

 the porcelain, but it does

 not leak. Even with the

 insulator on the pot, I

 would like my tea even

 hotter.  


Looking in my Mother's cupboards, I came across one of her tea cozy's, it almost fit my pot perfectly except it need to be longer at the top.

I traced it for the pattern, and made my own.

 
Here's the steps:
  1. https://blogger.googleusercontent.com/img/b/R29vZ2xl/AVvXsEjoXGD8R3QWjeSFkJs3NhDkSiav66u_OFNNx9Ban5j8GHeoqIv_FqCbBn0pApIxa9th6qC-q5uLX3o5Yy3U7x41RFueuGpmKezkSxBNq48tBFE2dM4uNJdGXJchRkyeWDrGyMurTDrto_b_/s1600/1.png   
Cut 2 fabric for sides and cut 1 for bottom. Cut 2 lining and cut 1 for bottom.
https://blogger.googleusercontent.com/img/b/R29vZ2xl/AVvXsEgUsxKHTfEdfUkErRaEWhFXMxy9nz5uSEuV7CXogwB98MbJTfIEEhOXFWu1Zt4D7V5fn1iuOoLDDDJ39YyMs9Gzxs3_QE-szXvpXTlB2dqARDhWKbSUsf5tDsd5iBP1zjvnFl6uXXDMP0Fn/s1600/2.png 
Sew Velcro on both sides of top of each side piece of lining.
 https://blogger.googleusercontent.com/img/b/R29vZ2xl/AVvXsEiDUVfdtI_56AxjamJ4FssT0hptcrMjlxWTXNf8r8c9xKv2ovdu195fpjotOM9S5Oe152FTBxYwZDXEUpyKa_EXuTgN5nqJjCUF7K_uVBkZPklw5dGls6qDjjpEth4mWbiAhmiF7eP4zXYW/s1600/3.png 
Sew 1/4" seam up each side around the top, leaving bottom open.
 https://blogger.googleusercontent.com/img/b/R29vZ2xl/AVvXsEhWUxurOr_aWhxOLUFh739zZxrsgJks2s8II_C_EvUFLfkQ44cjGpNtXOHIQVr1zymDWiX-u5WCmQjY0EgBvIva9KHwJ4AWq1iemY06eOHCNYFId33BQgqYS7VsO2AXV7TjZfPgqpHgBNqj/s1600/4.png 
Cut 2 foam for sides and cut 1 for bottom. Cut 2 batting for sides and cut 1 for bottom. Cut 2 heat bond for sides and cut 1 for bottom.
 https://blogger.googleusercontent.com/img/b/R29vZ2xl/AVvXsEiSiJQHYi8cQC51kyv6p-ndqEn_5HFy5BgQ8Y1EV3fFyIjZrM0c175HV9QvGQNT38t2fFwXcquyKv2OkxkuB1mXc6lEDCrKpQk2S7isiulcuAd6-lNkixxOx0O5g2wFahbPuWZhIrnmQd3h/s1600/5.png 
Iron heat bond to batting, iron batting to foam.
 https://blogger.googleusercontent.com/img/b/R29vZ2xl/AVvXsEhCFZ0YsTtyiiubCon0tw67XGh-Seul60Qe1Rit7afGX96UEQGkCK9ZY72ORfM6kO_frliESr3oW5w_CaGq61tCD_1oAnEgdcRSk1MFTLPvbwD6RpElBUeKyiufsSsJLQlyFOdHd-Fy7hHH/s1600/6.png 
Sew across the top 2" down, then in the middle, and on both sides.  See next photo.
 https://blogger.googleusercontent.com/img/b/R29vZ2xl/AVvXsEjtStdqGWhOm0_CbS9hkhqlXdV-QQN8-1EcoQWhePUPoAjRqwBYdyT6mbqi0yXtf5nPvdK-jIrfA6FE2cHMeP3rDFqO6Rc4PfzsEt6djX8WcwobRmNO9aSuh0C8ZQRuRG-M6b_1_9pXACum/s1600/7.png 
Sew both sides.
 https://blogger.googleusercontent.com/img/b/R29vZ2xl/AVvXsEgiQifNxELSaes6k-rGJPwgrSQTq77sjwkylZ-pM40YCDQVikAyudcxSGVxERM19l_7GHkJdFL2ix8Sic9If_3yxApmsrmsB5XAFZlRKWT62Szo9S7sMus8eLGR4Y0c4ljVeYX_RMCSPE1b/s1600/8.png 
Pin bottom of sides, right sides together, 2" on one side, 1" on the other side.
 https://blogger.googleusercontent.com/img/b/R29vZ2xl/AVvXsEhLFVlTH6TiwY-_0mNTq32jUlKB0KIJhnq0w8-UjqEQ6708Cgs40OAG_Q7Lia4FEDa84CmE4pPIZuxJRd3-0o7weP-hgtMLvKOHimbx2cDasFwAGArV_L7UhwiGFwhsYfX5QglIJE-8nd4n/s1600/11.png 
For bottom piece Iron all layers together, Sew 1/4" around, then zig zag edge.
 https://blogger.googleusercontent.com/img/b/R29vZ2xl/AVvXsEgvD_21aVBb22e4JEm4mTFr6eqF-e0pJv1MYEY5PVEf6VsksRcwQxATSYkrRfdPKEHBhrUPNXi4osF0U8Tjuod9Ue3TGDlVMKZpCldhqjqETUrQnE8o-EmGz53pN8476pFgTEPb9yuaDBtc/s1600/13.png 
Pin sides to bottom, Sew 1/4" around, then zig zag edges.

Insert tea pot!!


Let the tea sipping begin!!
Thank you for joining me,
Happy Sewing!
Also posting on State-line Crafter's.
Parties:  Sunday, Monday, Tuesday: funky polka dot giraffeKathe with an E, Wednesday: Handy Man, Crafty Woman, Thursday, Friday, Saturday.

Saturday, March 5, 2016

Antique Barn Sale Weekend!

"STATE-LINE CRAFTER'S"


Antique Barn Sale Weekend!


It's Cheryl,  what a GREAT weekend! My sister Connie, the youngest and cutest, LOL. Came down to Burlington, IL. this weekend and we went to 4 different Antique Barn Sales!

WOW! So much and not sure where to begin!It was like 2 kids in a candy shop, so FUN! The owner was busy getting his truck ready for the Kane County Antique Show. So Connie and I went different ways and remember the saying, Someones junk is someone else tresures. I found wooden boxes, to wooden boxes all different sizes, to a long set chair that goes at the end of your bed, to an old school deck that everything I found has to be refinish and when I start my projects I will share with you step by step on what I am doing. 


 Last year, one of the shops I shared with Connie today I had got this wooden kichen table for $5.00 not sure why, but thats when you don't ask questions. I gave it to Connie today and she will be refinishing it. Can't wait to see the what the real table looks like. 


What a Great weekend can't wait to share the projects when we get started!


Have a Great rest of a weekend! 


Tuesday, March 1, 2016

March Issue 2016

March Issue 2016

“STATE-LINE CRAFTER’S”

The March Issue is HERE!
tips and more
Enjoy your March copy of “State-Line Crafter’s” Tips and more…
Other Crafter’s Welcome
The Chicken Chick      http://www.the-chicken-chick.com
Funky Polkadot Giaffe  http://www.funkypolkadotgiraffe.net/