Wednesday, April 20, 2016

Pincushion

“STATE-LINE CRAFTER’S”

“CUSHION, CUSHION WHERE IS  MY  PINCUSHION”

“Any day spent sewing is a good day”
12496078_757282918660_2651876199780496681_o
Good day everyone, it’s Pamela!
So many of you that know me, know that I sew a lot. I have two sewing machines and a table I cut all my patterns out on. So I need to have  many pincushions when doing projects. I  am sharing with you a couple of pincushions that I have made and show you they’re pretty easy to make.
How many pincushions do you have? If you are like me, you have several sewing projects in the works that most likely involve fabrics of varying types and weights. Oftentimes, each requires a different type of pin to do the job right.
I know when I am sewing with knits, I prefer to use ballpoint pins. For sewing bulky fabrics, like fleece or thick woolens, I pull my long quilting pins. And for lightweight sheers or delicate silks, I know I can rely on my best ultra-fine glass headed pins. Of course, my favorite general purpose pins are my glass headed, extra fine ones — not too long, not too fine and super duper sharp! They tend to glide through most fabrics with ease and can stand the heat of an iron.
As you can imagine, that’s a lot of pins. It’s easy to see why just one pincushion is not nearly enough. Having several filled with each variety of pins at the ready makes shifting from one project to another a breeze. I even keep a wrist pincushion on hand for when I’m fitting myself or a client. I keep all of my pincushions stored in a rolling supplies cart that sits right next to my sewing table.
I just love pincushions. They say so much about who we are. Not only are they a great way to express our creativity and individuality, they are fun and easy to make. And they can be fashioned into just about anything!

There are so many fun pincushion patterns available. Here are just a few of our favorites:

janfebmar2016 010

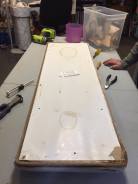
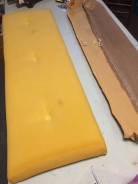
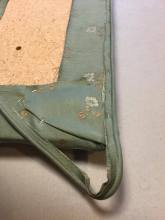
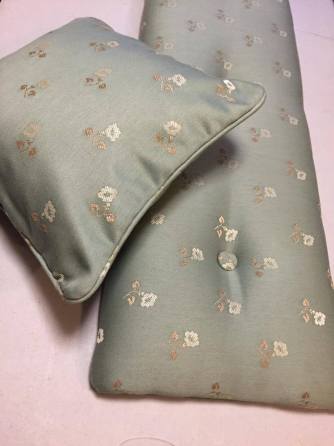
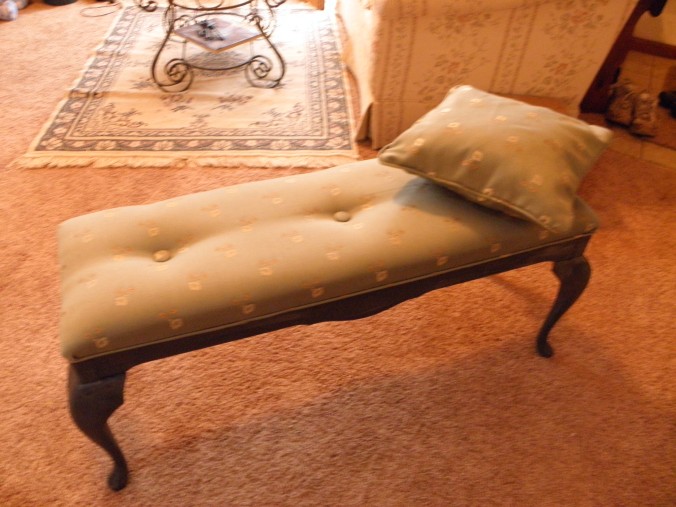
This pincushion bends and lays over the couch, when sewing I love watching old movies.


janfebmar2016 012


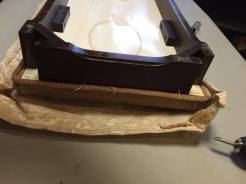
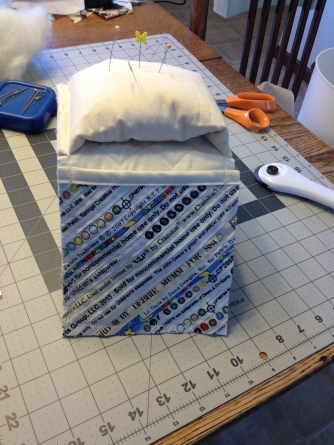
This one is a simple one but does the treat. Does matter what pins you use, I am a grandma and yes that is a diaper pin, from my grand sons diaper. But all in all I use them for sewing pins.
janfebmar2016 156


janfebmar2016 160
So this give you an ideal on what you could make, its fun and easy! Any questions let me know!

How To Make A Pin Cushion

pincushion:

Thanks Pamela

Friday, April 15, 2016

How to Build a Playhouse

"How to Build a Playhouse" 


Hello everyone it's Cheryl! 
I remember on the farm we had a tree house, it was there when we moved to the farm. So dad didn't have to build one for us! But if you promised your child that this is the year, well lets get started. You will have fun knowing that your child will enjoy what you have designed for them. Every child should have a playhouse or tree house. Lets get started!

Perfect backyard Playhouses


Our next major project will be building a playhouse. I wish we had a large enough tree or we’d do a treehouse but fortunately we do have some empty space in our back yard that will be perfect to build his own little retreat.
We’ve never built a playhouse before and although we are enamored with many of the amazing playhouses you can buy, it is out of our budget and we also want to experience the satisfaction that comes with building our own.
After scouring the internet and looking at numerous books for free playhouse plans, we’ve selected these three as the easiest to understand and fastest to build.
This book was published this summer and is an amazing resource for building your own clubhouse/playhouse. It’s written by a man who grew up building a playhouse with kids in his neighborhood and he offers all types of amazing tips for kids and adults to build their own playhouses. Using doors as walls and how to install windows of all sizes.


The author Lee Motherts asked us for a testimonial if we liked the book and we happily obliged with, “Delivers inspiration and instruction — plus playful anecdotes and nostalgic references — so every kid can build the clubhouse of his or her dreams.”
The above photo is taken by Lee of his daughters discovering a playhouse in their neighborhood.

The DIY Network includes a video as well as step-by-step plans for building a playhouse that includes roofing details and even a little mailbox and shutters. View plans
Lowe’s has really stepped up their game with their project plans and this playhouse is no exception. The cut list and detail is incredible and since it’s coming from Lowe’s you can safely assume that it’s one-stop shopping. View plans


Build a Playhouse

Ana White is the Queen of DIY and her kids projects are truly amazing. Here are her plans for a playhouse which include a perfect cut-list as well as design elements for you to choose from.
 View plans


Well these are some ideas on what you could build for your child. My friend Ted McGrath has plans for a treehouse and a playhouse. 

Wednesday, April 13, 2016

"Woodworking 101"

"STATE-LINE CRAFTER'S"


I Swing Big. I Swing With Everything I've Got. I Hit Big or I Miss Big.
 Babe Ruth


Hello everyone it's Cheryl!
Call me old fashion but I LOVE a swing hanging in my yard.

"Woodworking 101"

When it comes to wood working, I would have to say that it's one of the most fun things I enjoy doing. If I see something I like, I have to try it. 
71683c60b4f3cffa4d3ff82c1a8c6e0c
Now this would be an easy project for me to begin. Summer is right around the corner and if you have a great tree in your yard. The kids would love to have a swing. 
Well how do we build this?
In just an afternoon, you can create a classic tree swing for the whole family to enjoy from a simple plank of wood.


Materials Needed:


  • 5/4"-thick pressure-treated deck board
  • (2) 3/16 eyehooks
  • (2) 3/16 bolts
  • (2) 3/16 washers
  • (2) 5/16 quick links
  • approximately 40' of metal chain
  • flat finish white spray paint
  • miter box saw
  • drill fitted with 3/8" drill bit
  • blowtorch for antiquing wood (optional)
  • measuring tape
  • pencil
  • chain or bolt cutter
  • Pick up a 5/4-inch-thick piece of pressure-treated decking board from the home improvement store. Other woods with similar thickness will work but decking is one of the most affordable, sturdy and readily available types of wood. Using a tape measure, mark 20 inches from the edge of plank with pencil, then cut board using a miter box saw (Image 1).
    BPF_original_wood-plank-swing-set_s2-measure-cut_h

    Mark Then Drill Holes for Hanging

    Using a pencil, mark the board 2 3/4 inches from top to bottom and 1 inch in from the board's cut edge to create a crosshair (Image 1). This is where the eyehook will be attached to secure chain. Repeat on the opposite side. Drill a hole straight through the board in the center of the mark using a 3/8" drill bit. Repeat on the opposite side (Image 2).
    Use a flat finish white spray paint to lightly cover both sides of the board; paint should be light enough that you can still see wood grain. Optional:Once paint has fully dried, slowly sweep the blowtorch across the board to brown the paint for an antiqued look (Image 2).
    Secure 3/16 eyehooks in each hole with washer and bolt. The opening of the eyehook should face the board's cut edge.
    BPF_original_wood-plank-swing-set_s7-attach-eyehooks_h
    Determine the length of chain needed by measuring from the tree branch to the ground using a measuring tape. With the chain securely looped around the branch, measure 20 inches up from the ground on one side of the chain and cut using chain or bolt cutter. Measure the other side of chain then cut so the two chains are level. Tip: A height of 20 inches is ideal for kids and adults of average height but adjust these measurements to suit your family.
    Attach both chains to the board with a 5/16 quick link (Image 1). Before letting kids use the swing, have an adult test it out first.
    So there you have it are first project for the summer done. 

  • Happy Swing!

Special Events

"STATE-LINE CRAFTER'S"


"Would you like an adventure now, or shall we have our tea first!"
Peter Pan

Special Events

The finger sandwiches were puff pastry's with tuna, egg salad on white, ham spread on wheat, cucumber with cream cheese, pinwheels with ham, and veggie pizza.  There was a cheese and cracker plate.  Also on the table were nuts and homemade candies.

Special Events

Hello everyone it's Connie!
10553491_10204035864970031_5661830124427492192_n
I have a couple of things I would LOVE to share with you today!

I attended two very special events this weekend.  First the event, the Annual Girl Talk, God Talk TEA PARTY, at the Methodist Church, here in Durand, IL.
It was so much fun.  Of course I dressed up in a tea party ensemble I throw together complete with vintage hat, vintage sweater, vintage gloves, with vintage necklace I restrung with the same beads I added buttons, and a tea pot charm.

About 100 ladies gathered, 10 women at each table, each table has 1 hostess, the hostess brings in their own tea ware and decorate their tables in a unique style.

 This year, like last, the tables were done up in style.  Our hostess decorated with blues and aqua's, and sea shells with coral.  She gave each guest at her table this beautiful picture holder made with coral and added chocolates.
The TEA PARTY begins, of course with a prayer, and right away the finger sandwiches are past around each table.  Some of the ladies bring in their husbands who volunteer to serve the ladies tea and to keep the sandwich trays full.  They served Raspberry black tea, and Peach black tea, both excellent blends.

I know..... a lot, I was pretty full just from the sandwiches.  Then they bring out the trays of sweeties and cookies, so many different kinds.  Very nice selection.  With treats abound and the tea still flowing, an hour into it, they have a guest speaker come out with a presentation, this year the subject was "TEA'S" the beginning, to now with TEA PARTY DEDICATE from the beginning, to now. The info was  detailed and interesting; at the end of her speech, she pulled out a tea party book from 1905 that had games people would play back in the Victorian days when garden tea parties were very, very fashionable.
We played 3 of the games, they were fun, each table competed against the others, our table did not win any of the games, but we had a ball.
After that... the party broke up.
Me and (my girls) that's My Mother, and My Aunt Junie (with my My Sister meeting us there with her granddaughter), head north to my youngest granddaughter Eden's 2nd birthday party.

We ate first, needless to say, Me Mother and Aunt Junie, were not very hungry, actually all three of us wanted coffee.
Eden is 2 so of course, she had no interest in opening her gifts, though she got plenty.
After that more sweets, they had the birthday cake and gluten free brownies.

Happy Birthday, Princess Eden!

Cheers to a sweet day!

Sunday, April 10, 2016

Reupholstering 101

“STATE-LINE CRAFTER’S”

” You create your own opportunities”

Reupholstering 101

youzign-sisters photo

Hello everyone it’s Cheryl!
About a month ago my sister Connie came down and we hit all the barn sales around the Kane County Area. In one of the barn sales I found this bench and I knew it would look great at the foot of my bed. The price said $15.00, but when I asked the man he said $10.00. What a deal that was. Thanks Connie I enjoyed running around shop to shop looking for deals. Anytime!
12970368_1202358326454430_821898455_o12959389_1202358319787764_844768369_o (1)12986535_1202358286454434_366671085_o12970494_1202358283121101_282624705_o
So last weekend I went up to my sister Pamela’s farm, she said she just came from an auction and bought a lot of reupholster fabric that I could pick out something I like to cover this bench. WOW! She was right she had a lot to pick from. I pick a light leaf green pattern, and through the week she made a pillow to go with the bench. Thanks Pamela, LOVE it!
12970377_1202358269787769_2100016026_o12952839_1202358276454435_1931204930_o12991833_1202358253121104_189532936_o12986425_1202358256454437_1449966315_o
So this weekend I went up to my sister Leslie’s home and we started the project right away. I went there because Leslie is really good at Reupholstering and has done it for years. Leslie did not take over and do this project for, she took the time and showed me step-by-step on how to redo this bench. Thanks Leslie you were a Great teacher. Now after learning how to recover I am pretty sure I can recover anything.
12986485_1202358266454436_2008680566_o12970147_1202358249787771_432087379_o
Who every recovered this bench before had no idea what they were doing or cared to ask someone how to do it the right way, it was badly done. So the first part was to take out all the staples, the person before put all the staples into the wood, so they damage the wood a little, no problem we could fix it.
After taking everything a part, the pieces we took out, well that was are pattern, it putting it back together again.  I do believe it came out pretty good. I didn’t paint it there I took it home and painted it with chalk paint and then touched in spots with gray paint. Let it dry and screwed the seat back on.
Well see for yourself! I think it turned out pretty good!
OLYMPUS DIGITAL CAMERA

DONE!

LOVE IT! Thanks to All my SISTER”S for helping with this project.

Until next time!


Thursday, April 7, 2016

A Country Wedding

"STATE-LINE CRAFTER'S"

A Country Wedding

"Two Souls but a single thought
Two Hearts that beat as one"

John Keats

12002529_10153574966274534_5580773250846569221_o
Hello everyone it’s Pamela!
12496078_757282918660_2651876199780496681_o
Most of you know that my son Bill was married last September to a Beautiful New daughter-in-law,

“Joy”

I LOVE watching the family grow and the grand children that come with it.
So today I would like to share with you some of the decorations I made for this wonderful occasion. I was so happy to be able to help them in making a lot of behind the scenes decorations.

1312016 141
1312016 053
1312016 095
1312016 063

First off I found this old bed and took off some of the springs and made candle holders out of them and add candles later at the wedding. The mason jars I added lace and had Todd cut logs up to set them on. The bucket was made for the flower girl to carry. I also made the guest book for everyone to sign.

1312016 094
1312016 081

These are some of the table clothes I made for the guest table and the cake table. I used burlap fabric, designed them myself.

Here comes the Bride!

11053403_10153574951514534_3163485475903684102_o(1)


The wedding itself was in a corn field at my mother-in-laws, right in the middle.

Joy was such  a Beautiful Bride!

11147887_10153574953119534_7434379972355787230_o

This is a picture of Joy and her Father, what a Great Guy!

11703588_10153574957304534_5466564067032316293_o

This is a picture of the Groom and Best Man!
12017701_10153574949814534_1789990013620478645_o

The Beautiful Wedding Cake that my mother-in-law and sister-in-law made! We were able to eat the butterflies too!
12029746_10153574956674534_2917061307601618089_o

“Joy and Billy”


So Beautiful, just LOVE them so much!
I wish them all the happiness life brings them!
XOXO MOM

12030488_10153574950724534_735054411801764988_o

A day in The Country!